Thursday, December 20, 2012

And now to put those tags to use......

A little bakers twine, a little wrapping and a bit of ribbon and my tags, Tim Holtz tags, Funkie Junkie tags and almost all Ranger tags, lol. I am having fun finishing up my wrapping this year.

Monday, December 17, 2012

Tag 12 - Noel, Noel, Funkie style!

As soon as I saw this tag, I thought of Tims rusted enamel tech from last years 12 Tags. So off I went...
I used the seasonal colours of distress inks and followed Tims tech. I had cut out a bunch of lamps from corrugated cardboard earlier and painted this one with the pewter distress stain that I got from thefunkiejunkie festived him up with leftover cedar boughs from tag 10 and a silver bow. I added a little liquid embroidery snow and a lamp (burned out Christmas tree bulb, can you see it in my tiny pic??) THickers letters for Noel and I MADE IT!!!!!!!!!! All 12 tags and one of my favourites at the end! YAY Linda for initiating this challenge :) I needed it to get out of my no crafting rut, now the ideas are floating around my head for gifts and fun......

Tags 9-11 for the Funkie Junkies 12 Tags of Christmas

I have to admit that I wasn't that inspired by this card in the challenge, and I had to think about it. That being said, I love the tag I made after all! I decided it was the wood grain that I liked and wanted to pull from the inspiration tag. So my snowmen have a Faux Barnwood treatment from the technique junkies newsletter (2011, maybe august?) using white glue, I love it! and aren't they cute :). The background is a simple Stain smoosh with blues and gold, I tried to get a northern light look going. My snow is a cotton ball pulled apart, the red mesh is a piece of bag that oranges come in from the grocery store and the ribbon is scavenged from a candycane. My jingle coin and the red burlap are from Linda's store, the FUNKIE JUNKIE BOUTIQUE that is hosting this challenge. And just have to share......I won on the sunday share that the funkie junkie boutique blog has every 2 weeks, YAY!

Tag 10 - wooooahhh, I don't have any of those toys either.....hmmmm what to do??? I can't give up, I have almost finished this challenge. I like the ornament Linda used, I really like this tag, I must say. I like the embossed background too........

Here's what I did, shattered glass Embossing Folder, looks like a snowball just got thrown. That ornament detaches and hangs on the tree. The chipboard ornament is from CTMH and comes in two pieces. I sandwiched the picture between the layers and covered the ornament with more of that music paper. The top is decorated with Tims' festive greenery which is 'yup, you guessed it' from Linda's store as is the red hemp.


Tag 11 - It's beautiful, but I feel the pressure of time to create something like that, lol. Take a look at this and let me know what inspires you. I love the whole tag, but the wreath really is the focal point. What can I do with a wreath?
This picture doesn't do it justice....it's a tag covered with frayed burlap crackle paint, and sponged over with a blue ink. BUT the crackle won't photograph. I cheated and used thickers letters for joy, another candycane ribbon and martha stewarts cedar bough punch to create a wreath....which stands out way more IRL from the background. Red stickles from the boutique add some sparkle.

Tag's 5-8 of the Funkie Junkies 12 Tags of Christmas

 This is tag # 5, for the challenge over at The Funkie Junkie. This tag was created from Linda's Tag 5. I was inspired again from the background and the resist snowflakes. This is the first tag that I really moved away from her layout and really echoing the tag she created, but I really like how it turned out.


I used CTMH inks and the shimmer ribbon over a scrap of christmas music paper by ? that I clear embossed with snowflakes. I used Tim Holtz's new minis for my Christmas tree, stamping it once on the tag and then cutting out another one and popping it over top for some dimension. The stars are a die from My Favourite Things that I sprayed with gold shimmer from Lindy's Stamp Gang. I had another idea for this challenge, but I will post it later.....hopefully I get it done before the end, but times a'ticking :)
 

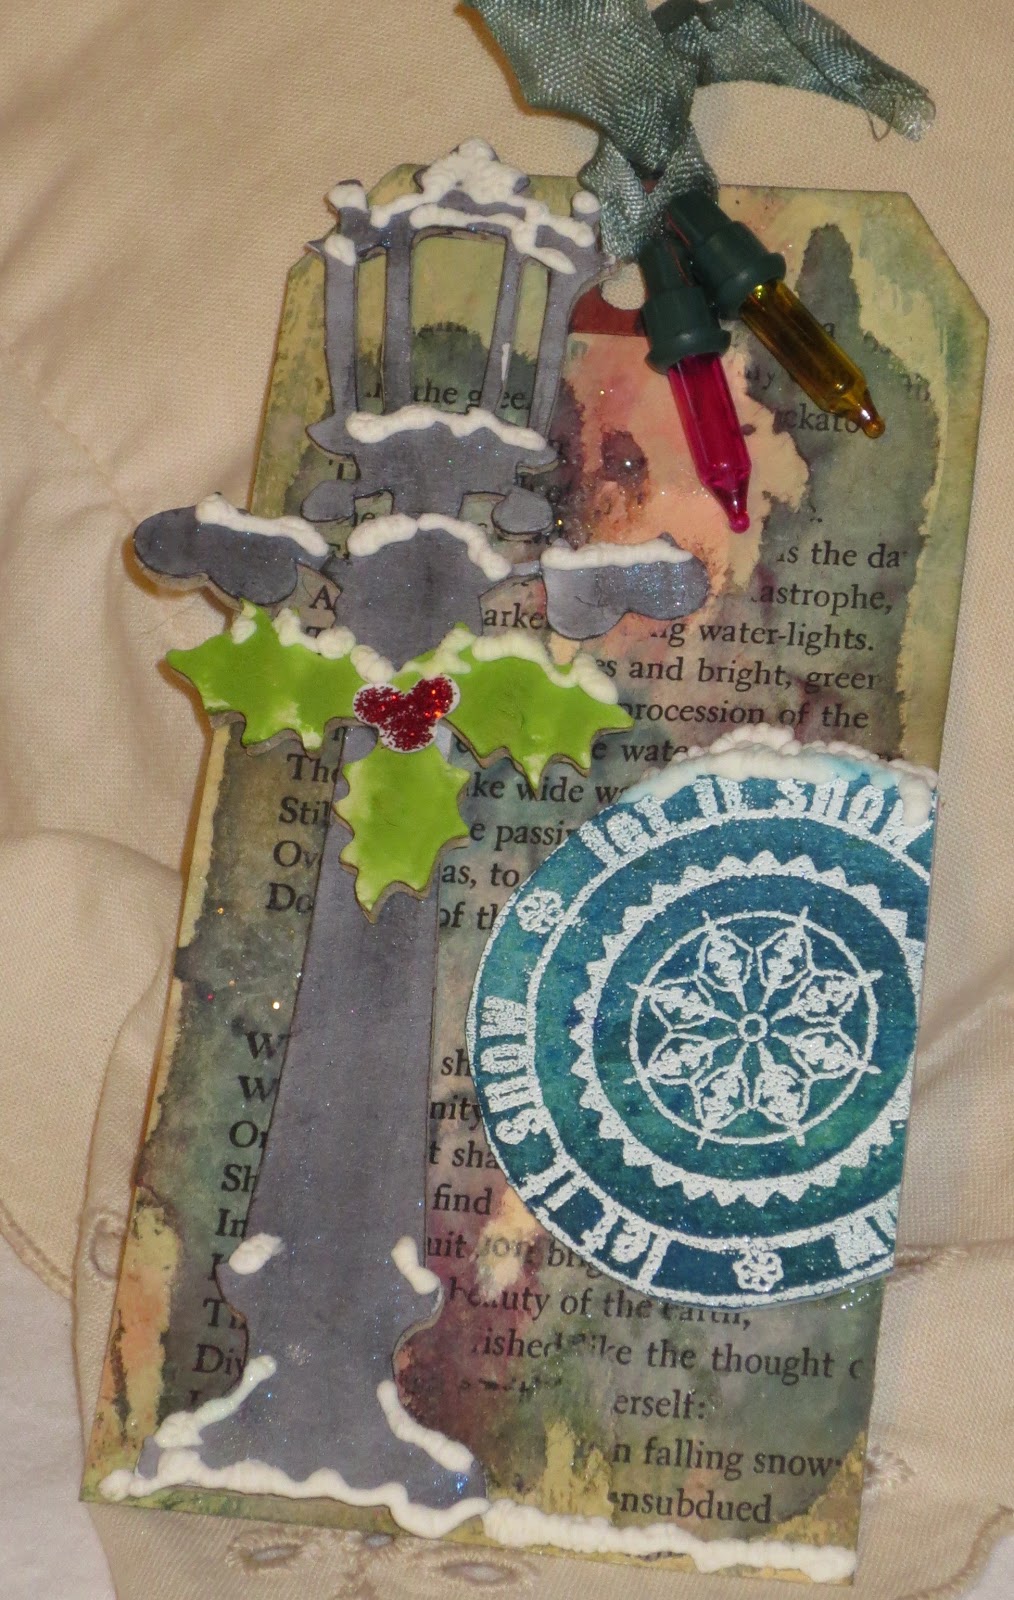
TAG 6 - I focused on the background again, using an old book and ripping off shreds of it....the whole technique can be found here at the Funkie Junkies site. I followed the layout, kind of, with a lamp post instead of a tree and the circle element beside it. I just got this die and couldn't wait to play with it. I used lots of liquid embroidery puff paint and managed to scavenge old light bulbs from our strings when we were decorating.

Down below I have my example of Tag 7, see the original here. I found an example of the technique on the Simon Says Stamp blog and followed that. I managed to sneak more lightbulbs on here, lol. I really wish I had picked a different colour of Pearl Ex, but didn't have time to redo it.....

I pulled in the corrugated cardboard theme in my holly leaves and used an old Warm Days stamp set from CTMH that I find I pull out A LOT. 


YAY, Tag 8 and this post is almost done. I meant to spread these out, but lost my little camera and had to get them posted so I could link them up. This is my favourite tag and probably the trickiest to make so far.......I am going to make more of these, for sure. I just wish I could take better pictures to show you.

So, for some reason, I immediately went from the Funkie Junkies Tag to wanting to do this. Its shiny, touchable, fuzzy, embossed, corrugated.......whats not to love, lol. I really worked at capturing this to share how gorgeous it is IRL. So, I started with a blank tag and stamped a CTMH Merry Christmas in black archival ink. I dumped gold EP over it and heated it. I then stamped Santa and masked him off.
I sprayed Lindy's Stamp Gang Rudolph Red and a Bells of Ireland Green on the tag, blotting it as I sprayed so it wouldn't run under my mask. I lifted the mask, coloured the red and green parts and added liquid embroidery and fluff to his face and plain liquid embroidery to the hat and PUFFED it.....yummy! I glued on a piece of red burlap compliments of the Funkie Junkie Boutique, as is the red twine under the bells. Who by the way is sponsoring this challenge and is my favourite store to shop in.
Whew, a monster post, and 4 tags to go in less than 24 hrs!


Wednesday, December 12, 2012

12 Tags of Christmas- Tag 4 Funkie Junkie Style

Based on the Funkie Junkie's Tag #4 with a country theme, I chose the gingham background and the pipecleaner star (simply because my kids were playing with them) as my inspiration. More Tim influence in the deer, the greenery, the coin and the paper accent. I bought the Seasonal Paper pack from the The Funkie Junkie Boutique, hmmm, likely the deer and coin too, lol. Again, my card isn't as flashy as Linda's, but I'm having fun regardless! The Funkie Junkie is sponsoring this fun challenge and is having a great reopening sale in January, be sure to stop by.

12 Tags of 2012 - Tag 3 Funkie Junkie style!

Ugh, I need a picture taking course. This tag is stunning IRL. Based on the funkie junkie's tag #3, loosely, I liked the colours and the snowman and borrowed the frosty ;).  I used the snowman from the Tim Holtz mini's, popped him up (stamped underneith first) and crackle painted him. I used the old CTMH markers which are similar to the new Tim Holtz ones and coloured over the crackle before popping him on the tag. The background is simply foam brushed ink spritzed with water. Now, the snowflakes were a freebie from the Funkie Junkie Boutique with an order I placed and the Frosty was embossed with a sparkly white embossing powder I received as a gift. The ribbons are from CTMH, the loopy one being the kraft border remnant with glitter dumped on the sticky side and adhered with glue to the tag.
Check out the Funkie Junkie Boutique in January, they are sponsoring this challenge and are having an amazing reopening sale come January.....

Tuesday, December 11, 2012

12 Tags of Christmas 2012 - Tag 2

Okay, confession to make....this background has been sitting on my desk since Tim posted his September tag. So when I decided to try to meet the challenge on  the funkie junkie website, I smiled. One tag partly done! Now, I have fallen in love with the Funkie Junkie Boutique this year and I can share why.....The gears die I bought there and all the other embellies were free little gifts that she tucks in your parcel EVERY time you order! AND they are sponsoring this challenge with some amazing gift certificates too! Well, other than Santas face, which I cut out of random paper from my Christmas stash and the No Peeking stamp from an OLD CTMH stamp that I embossed....
So my inspiration on this tag.....the steampunk look, for sure ;) Merry Christmas....

12 Tags of Christmas 2012 Tag 1

This picture doesn't do justice to the tag, which is luminous IRL. I was inspired by the funkie junkie 's background, and attempted to emulate it.....although hers is better, lol. My heart is created from the Faux Rusty Metal technique from the Oct/Nov 2011 newsletter of the technique junkies. HA, there are a lot of junkies involved in the making of this tag! The greenery is from the Tim Holtz seasonal strip die that I got at the funkie junkie boutique. I created the banner free hand and stamped it with a CTMH stamp border that I masked off for just the peace on earth sentiment. The wee snowflake on the large star was lying on my desk begging for a place, so I stuck it on here. Go check out www.thefunkiejunkie.blogspot.com and see her great tag that inspired me!
The Funkie Junkie Boutique is sponsoring this challenge, so be sure to go check them out in January!
PS Linda, thanks for replying to my question about the background, now I need to try again with less absorbant paper and see what happens........

Thursday, December 6, 2012

The Sleigh Ride


You have to listen, they are amazing!

Wednesday, December 5, 2012

3D Christmas Card

Inspired by Shelly Hickox over at StampTramp, I decided to try the technique junkies 3D technique from the last newsletter. I also wanted to try using less traditional colours on my card and use up some of that formidable stash of scraps! I love it and I used a lot of older supplies too :). See my number 25? I think this is my favourite part, lol....it is created from plain white chipboard and my husband swears it is metal. The new metallic stains from Tim Holtz are amazing.....I coloured my numbers with the bronze, then archival black and finally silver. I wish I could take a better picture...the depth of colour comes through in real life.
My tree was cut out at 3" on my cricut (pick a tree any tree, I don't remember what cartridge I used). I cut 5 of them and scored them and glued them together with liquid glass. The background is embossed with a snowflake folder and framed with Tim Holtz mini cabinet die that has the centre cut out with a spellbinder. All painted with Modpodge and doused in Diamond dust.
A bad picture, but I splurged on the pop n cuts by Karen Burniston after following Shelly for the last few months because I love playful cards. The Merry Christmas pops up off the page. I love the background paper, it reminds me of a homeknit sock, a Christmas favourite. All stamps are CTMH and I think I gave credit where due ;) Thanks for visiting.

Friday, October 12, 2012

Witchy, Witchy


yeesh, that's hard to capture. I used distress ink with a little bit of Lindy's Stamp Gang spray and now it's so reflective you can't photograph it! Kraftin' Kimmies Halloween stamp and a super amazing Stained Marbles background (Tim Holtz) make for a fun tag for Rangers Contest to win the new inks. The saying is done on a piece of cardstock cut out with a nestability that was originally done in the Shaving cream technique from technique junkies newsletter and treated with Shelly Hickox faux enamel technique making it plaque like. Whew....a simple looking tag with lots of stuff packed on it! I hope I credited everyone where it's due!

Friday, October 5, 2012

The Trains-formers


I  am posting this for my son, an avid fan of trains formers, Thomas the tank engine and all things train. The series was yanked due to copyright issues, but was highly entertaining. This is the video announcing that, a softened blow perhaps?

Tuesday, September 18, 2012


Look at the new technique that they are sharing over at My Craft Channel! Super easy and fun :)

Tuesday, September 4, 2012

September Special

Between August 15-31, get your Cricut Artiste cartridge for $99.00. The Cricut Artiste bundle includes:     - Cricut Artiste (suggested retail price of $ 59.99), Three Stamp Sets (retail value of $17.95 each), & Three Dimensional Element chipboard sets (retail value of $4.95 each). That is a total recommended retail price of $128.69 for the much lower price of $99!

- Because you spent over $35, you can now purchase the It's Your Day stamp set for $5.00. This is a $35.90 value stamp set for only $5!  


s- Because you pent over $50, you can now purchase the September Stamp of the Month for $5.00 a value of $17.95!(coordinates with the Art Philosophy cartridge)
 

 That is a total of 6 stamp sets, 1 cricut cartridge, and 3 sheets of chipboard for only $109.00 before tax and shipping!

You Save $78.54 What a deal! Yay, CTMH!

Wednesday, August 29, 2012

Tuesday, August 21, 2012

Friday, June 1, 2012

Recycling/Repurposing Rocks!

It's time for another Use It or Lose It Challenge! This time we are repurposing things. I have had my hands on these little boxes for a while, and had the idea in my head for just as long, but never put the two together. The box is a slide box, for holding the glass slides that you use with a microscope....we use a ton of them at work and just chuck them out. So I salvaged :)For my mom.....She's amazing. An old paper pack that I wasn't too thrilled about but had to have, lol,(Bliss?)
This technique came from Shelley Hickox here. I loved this idea and have a ton of these candles from IKEA. What do you think? It's a simple gift and can be personalized any old way you like.
a bit of bling and then the surprise.
I tried to close up on the bling flower, but my camera is dying...in fact is dead as I write this :(. I used chocolate ribbon scraps, a crocheted flower, a button bling and the pin stick. I stamped the super mom from a SOTM that I had never opened. It fit perfectly on that metal accent piece that came with the white flower. All CTMH stuff that has been languishing in my embellishment drawer.

Monday, April 30, 2012

Treasure Box

My son wanted a box to keep his tooth fairy money in and various other treasures that he has found and I had this plain wooden box in my stash (no pic, sorry). He loves blue, so I started out with Lindy's stain all over the box, adding in different shades as it suited me. Next I took a cut out of the mini gears die cut from the Tim Holtz Sizzix die and temporarily stuck it to the lid. I put a puddle of white acrylic paint on my craft sheet, spritzed it with water and dabbed my paint brush into it. I washed this mix over the gear shape, just to give a faint impression of the gear....and I love how it looks!
His name is created from some dollar store letters that I used faded burlap crackle paint on and washed over with the blue stain. The stamps are all stamped in archival black ink, from artistic outposts steampunk set. I used some (very) old rubons from CTMH for the inner lid, which I have been hoarding forever, lol. Lots of Tim Holtz hardware and I have a treasure box that my laddie loves!

Wednesday, April 25, 2012

Fabio goes Hiking - Lindy's Stamp Gang Post

Fabio went hiking with me for Lindy's latest product contest. I tucked him in my pocket and away we went. My puppy Pal was a little put out on the hike, as fabio got a little extra attention and Pal tangled with a porcupine (much against my advice, I may add). THAT took a few hours to get over! Lindy has this cool contest for her newest line of 'FLAT FABIO'S'. All the colour and no shine. Be still me heart...this sounds like something I will love and have to play with. AHHHH, for the guys in my life :) Thank you Lindy!

Thursday, April 19, 2012

Rainbows, Clouds, Sunshine - Use it OR Lose it

This challenge was to use rainbows or a piece of that theme on your layout. I had been toying with an idea for a while, so this pushed me to put it to paper. I used a tutorial from splitcoaststampers for the triple layer popup card .

Can you see the dimension?

I used Sky Blue cardstock for the base and literally flipped through my scraps and pulled out the colours of a rainbow. All paper is CTMH, the stamp set is Splendid Day (a favourite that I look at and rarely use, lol).
I had to create a band to hold the card shut, so glued a tree cutout onto it to hide the glue. I know the inside of the card is unfinished, but I can't decide if I am sending a birthday card or using it as a sorry you are hurt card for a coworker....I will finish with 'a little birdie told me....you took a tumble or a little birdie told me, you are having a birthday"
the stamp for a little birdie told me is from ClearDollarStamps

Wednesday, April 18, 2012

I went for a walk and this is what I found.....A trip down Nostalgia Lane

Haha, eat your heart out Tim Holtz...for inspiration nothing beats this.
Old wooden rims
Old Tractors parked and left
A pile of metal wagon wheels
An old tractor seat....hmmm, stools?
and gears,tons of gears, buckets of gears, sprockets, flywheels and cool steampunk STUFF! I was inspired by Tim Holtz collections as shown on the Creative Chemistry course and I knew my brother was a collector and I want a clock like this. So I went shopping :)

Thursday, April 5, 2012

Altered Paper - Use it or Lose It Challenge

Maybe that title should be Ugly Paper Use it or Lose it, lol. The challenge is to take paper that you aren't that fond of and use it up by altering it in some way to make it palatable. So, without further adieu

....Wings, how I struggled to like you and now.....you are done! Hooray! I used the Joseph's Coat Technique from Technique Junkies and White Daisy inked a butterfly over it. The stamp sets used are Find Your style and an unnamed promo set. The outer butterfly in turquoise is a leftover from my Creative Chemistry class....gold embossed on kraft paper with a musical background stamp and painted with LindysStarburst Spray in turquoise.
A close up of the paper....

Tuesday, April 3, 2012

Creative Chemistry with Tim Holtz - Embossing Techniques

I love the rusty enamel technique. Truly my favourite so far and I see using it lots. I need to get some of the Distress Embossing Powder.

I also had a chance to play along with Tim Holtz's EAster tag. I love this little guy and thank you CanadianNickel for the easter bunny so I could play along.

I printed out the postcard from a site (I need to get back to you with the link :( ) Used MFT's grass die with kraft paper and pear ink direct to paper over top and sanded lightly off. I cut my own bow out freehand and used kids glitter glue to pretty it up. The damask embossing folder in the background and a kraft tag from the ARt philosophy cart. I think that sum's it up. i LOVE it :)

Friday, March 30, 2012

Creative Chemistry with Tim Holtz

I have been busy these last two weeks taking an online course with Tim Holtz. It's all about how inks are created and how to make them work together. Of course this is primarily aimed at Ranger Inks and the Tim Holtz line, but I thought.....hmmmmm.....would this help me to play with my existing CTMH inks and get more out of them. So, here are my TAGS, with CTMH inks as I do not own any distress inks and subsituting freely as I needed to. For the Stain Tech's I used Lindy's Stamp Gang Stains and got that delectable shimmer on the projects.
Day 2
Day 8
Day 3 - I had no glossy paper, so I used HP photo paper, it seemed to work fine, but I am going to try this again when my glossy paper arrives. You cannot see the black archival stamping on the background of this last tag, due to my poor photography...I love this tech. in real life!
Day 4 - I used the art philosophy cricut cart to cut out the number background to make my stencil....a little smaller may have worked better, but I like this tech. (the middle tag). The last tag....no cut and dry felt, so I used an abd pad from the hospital. We will see if it lasts as long. The effect is stunning on this detailed stamp!
Day 5
Day 6

Thursday, March 22, 2012

Use it Or Lose it Challenge #4 - Paper Piecing


I love this paper pack, I don't even know the name of it anymore but I hoarded every last scrap :) I know the stamp isn't CTMH but she's a cutey Pure Innocence from MFT and I have waited and waited to use her. I fell in love with this idea of raindrops on the clear overlayer (I used liquid glass to make drops). I attached the girl to the clear layer with liquid glass and she seems to dance on the grass as it shifts back and forth. THat lovely raincoat is a fun piece from our hsaving cream technique of the last challenge. I cut the tag from the Art Philosophy cartridge. MUCH more coming to my blog as I get time, because I am taking Tim Holtz's class on the chemistry of ink and working it with my CTMH products....WAY too much fun. This is taking me some time because I do have to work for a living as well, and my kids need SOME attention :)